
Every website has at least these three things; a domain name, a hosting provider where it is hosted, and the actual content of the website.
Most domain name registrars such as Namecheap and GoDaddy usually offer hosting services alongside the sales of domain names. But sometimes the services of other hosting providers might appeal to you more.
In this article, you will learn how to transfer a domain from Namecheap to another hosting service. I will use HostPapa and GoDaddy as examples here, but the process is similar to other hosting services.
Prefer video? No problemo! You can check out my video tutorial below.
Best Hosting Provider in my Opinion
I have used several hosting providers in the past, and from all of them, I prefer HostPapa. HostPapa is a relatively unknown hosting provider, but it provides excellent hosting services.
While there are certainly cheaper hosting services, HostPapa isn’t expensive. HostPapa comes with a free SSL certificate and a free domain for a year. It also has an excellent server performance and has a five-star rating on Trustpilot. When compared to other services I have used, such as HostGator and GoDaddy, HostPapa comes out on top.
HostGator is particularly bad, with subpar server performance and a one-star rating on Trustpilot. GoDaddy is still okay but lacks certain perks such as a free SSL certificate out of the box. It also has a two-star rating on Trustpilot.
If you haven’t chosen your web hosting provider yet, have a look at this video I made on how to choose the best web hosting provider in 2020.
Alright, let’s get down to business!
How To Transfer A Namecheap Domain To Another Hosting Provider (GoDaddy and HostPapa examples)
So if you prefer the hosting services of other platforms, you can transfer your domain from the registrar you purchased it to another hosting provider such as HostPapa or GoDaddy.
Note that we aren’t transferring the domain between registrars, we are only pointing it to another hosting service. To transfer Namecheap domains to another hosting provider, there are three major steps to follow.
- Obtain the name servers of your hosting provider
- Change Namecheap nameservers to the obtained name servers
- Verify that the nameservers have been changed
1. Obtain the Name Servers of your Hosting Provider
The first thing we will do is get the nameservers of the hosting provider we want to point our Namecheap domain to. This step isn’t the same for all hosting providers. If you are using hosting services like HostPapa and Bluehost, all you need to do is search for the name servers on the internet.
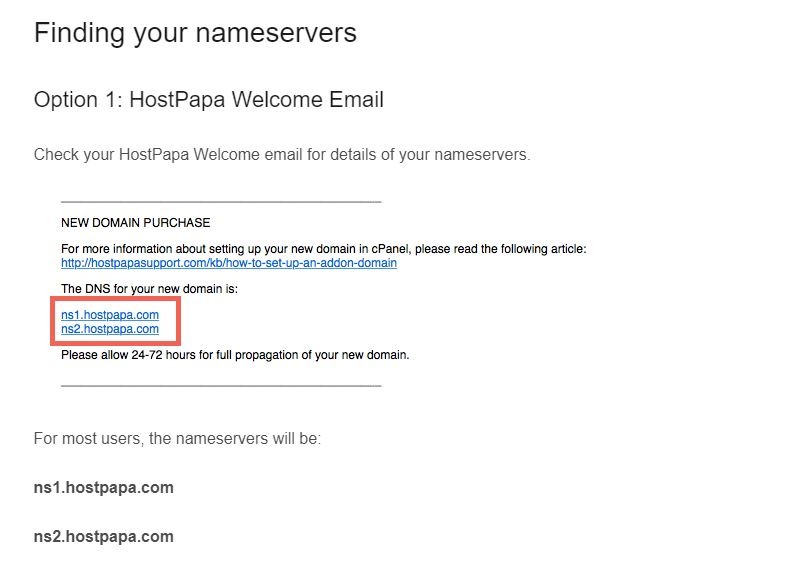
Finding your nameservers:
They are usually the same thing across all their hosting types. Here, I am using HostPapa. You can see the nameserver in the screenshot below.
Other Hosting Services:
But for other hosting services like GoDaddy and SiteGround, the nameservers might change depending on your hosting type. To get the nameservers, first, log in to your hosting provider’s cPanel.

Under Domains, click on Addon Domains. This should lead you to the Addon Domains page.Enter the domain name you want to point your hosting to in the New Domain Name field and hit enter. The remaining field should fill in automatically.
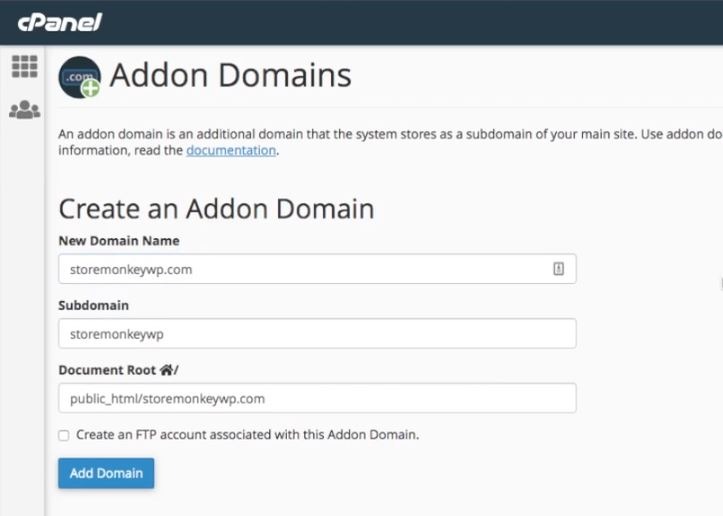
Click on Add Domain to create the addon domain. You should get a message saying it was created successfully. Now click on Go Back to return to the Addon Domain main page. Scroll to the bottom to check if your addon domain has been added.

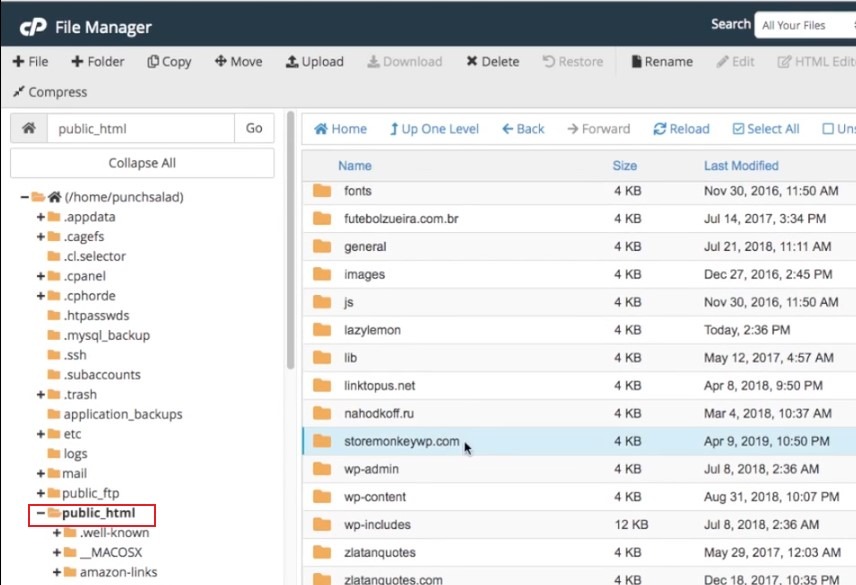
As you can see above, the addon domain “storemonkeywp.com” has been created. If you open the document root of the addon domain, you will notice that it is currently empty. We will get back to this in the third step.
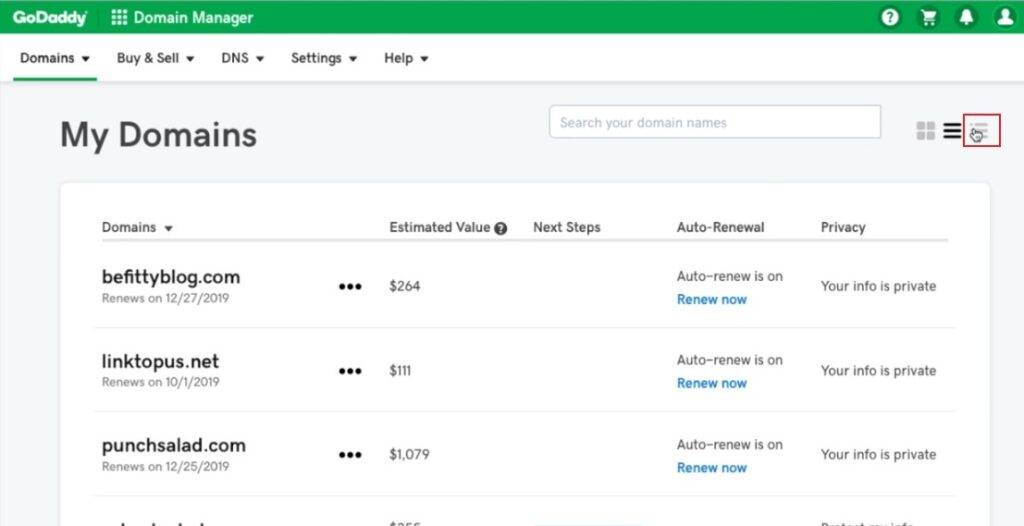
Once we have created the addon domain, our next step is to get the name servers for the addon domain we just created. To do this, make sure you’re logged in, and select Manage All from your products page.

This takes you to the domains page. You should see all your domains here, including the addon domain you just added. If you can’t see your it, change the view by clicking on the rightmost icon from the icons beside the search bar.
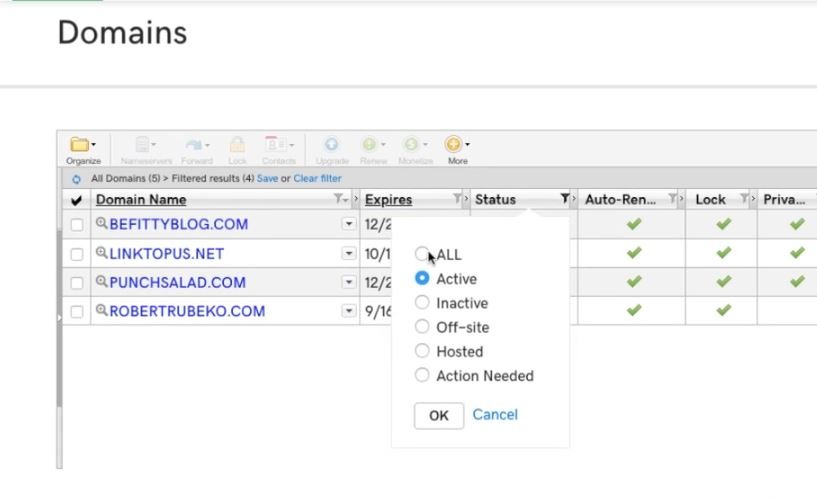
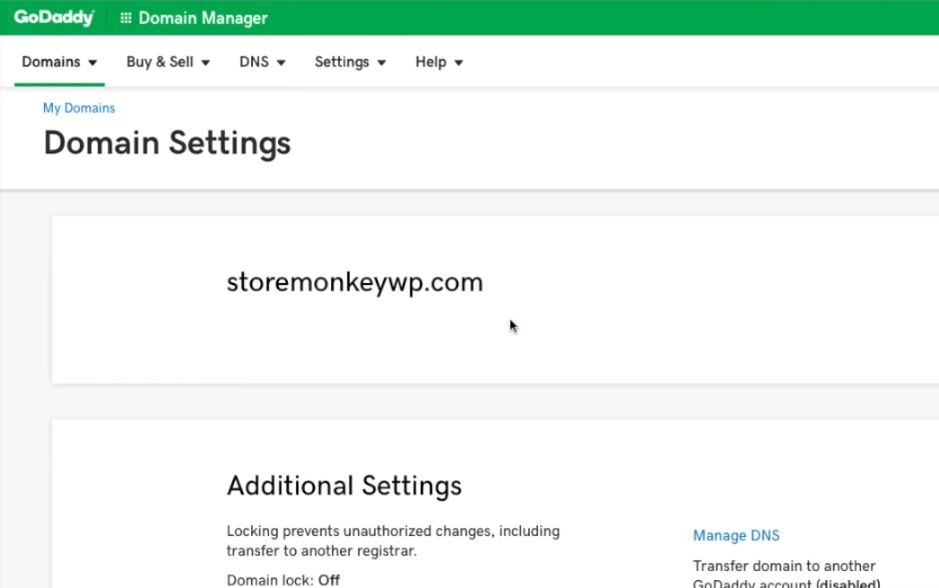
This should show a more detailed view. Check the Status column and make sure the filter is set to ALL. You should now see your domain listed.
Click on the domain to go to its settings page. Now click on Manage DNS.
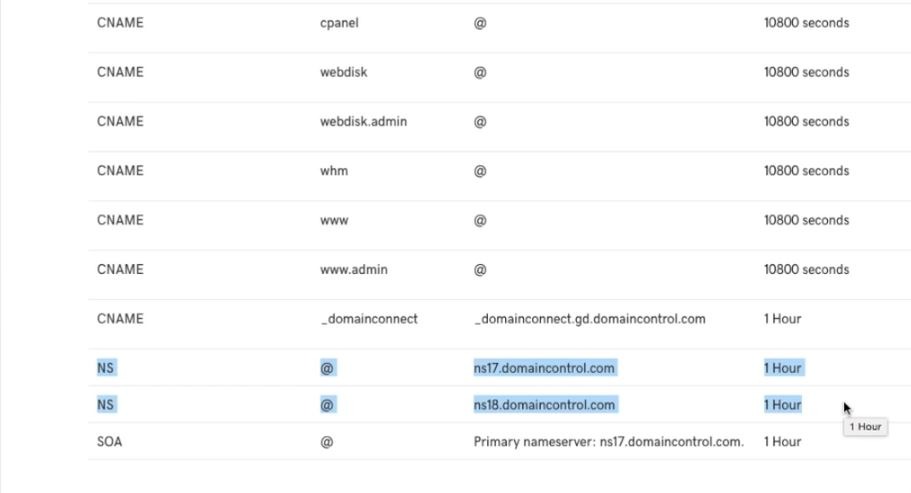
This takes you to the DNS Management page for your domain. Scroll down the page till you see an entry for NS. There should be two of them. These are the nameservers we need.
We can proceed to the next step now.
2. Change Namecheap Name servers to the Obtained Name Servers
Changing the Namecheap name servers is a much easier process than the previous step. First, make sure you are logged in to your Namecheap account. Next, hover your mouse over your username and click on Dashboard from the dropdown menu.

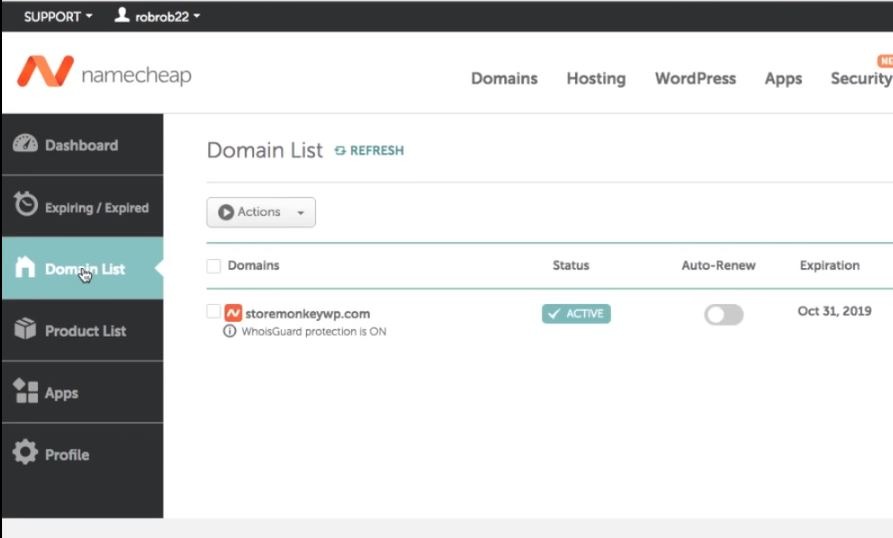
Now click on Domain List from the side menu. You will be presented with a list of all your domains. Find the domain you want to transfer and click on Manage.
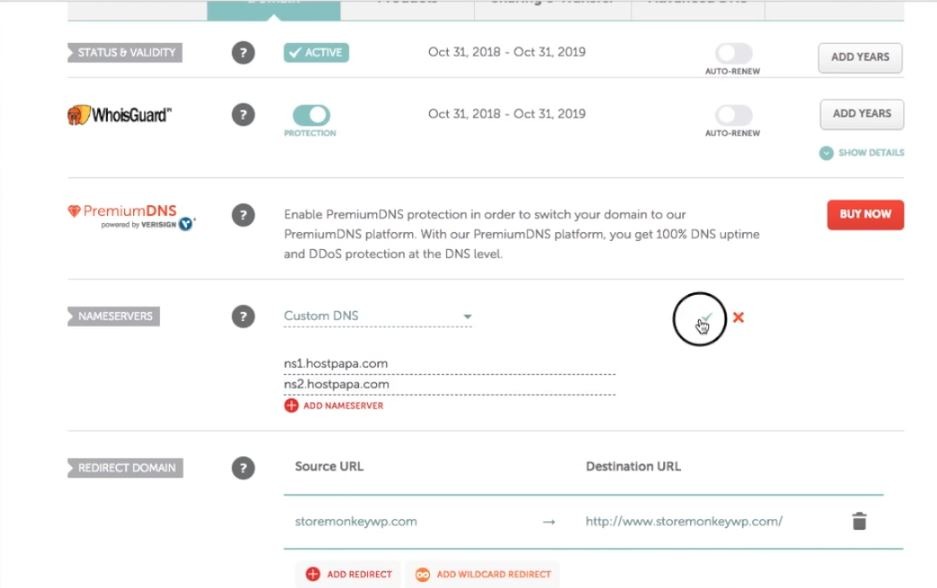
When the page is done loading, scroll down till you see NAMESERVERS. By default, Namecheap BasicDNS is selected. But since we are pointing the nameservers to another hosting provider, we have to choose Custom DNS.
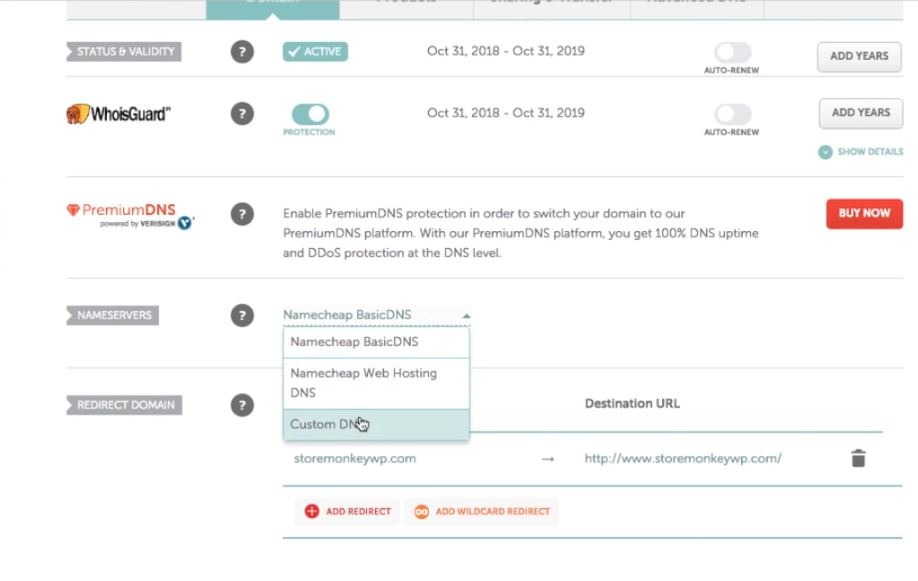
You should now see two empty fields; Nameserver 1 and Nameserver 2. This is where we’ll fill in the nameservers we obtained from the previous step. Once you have filled in the two nameservers, click on the green check mark by the right to save it. Here, I used the HostPapa nameservers we obtained first GoDaddy’s.
The nameserver change doesn’t reflect immediately. It might take up to 48 hours for the change to occur, but usually this happens in under an hour.
3. Verify if the Name servers Have Been Changed
To verify that the name servers have been changed, enter the URL of the website in your browser. Note that if your website has no content, you won’t see anything. Make sure to add some HTML code or install WordPress to your new domain. You can check out my video tutorial on how to install WordPress on cPanel.
To add HTML code to your website, go to the cPanel of the hosting service you have chosen and click on File Manager.

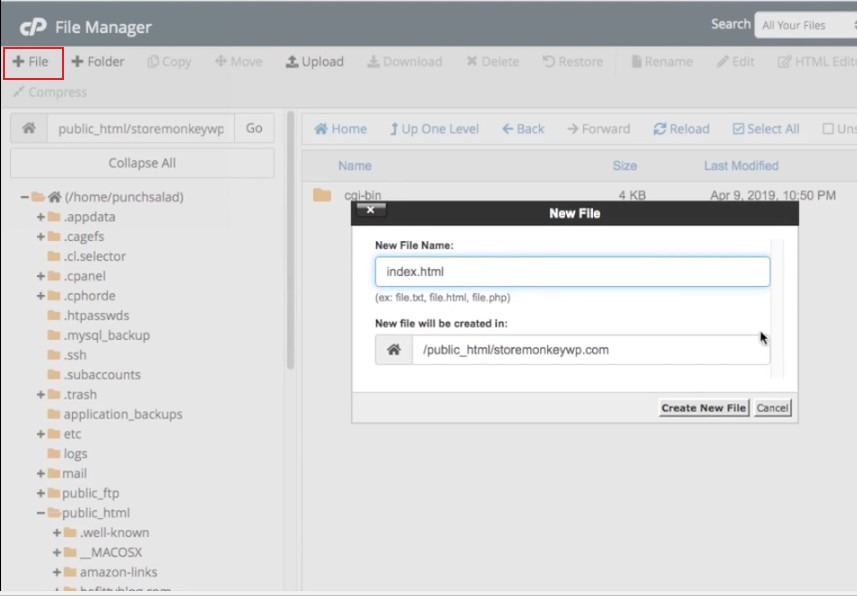
Next, click on the public_html folder from the panel on the left. Now click on the folder with your domain name in the right panel.
To add a new file, click on File at the top left corner. Make sure the file is named “index.html”, then click on Create New File.
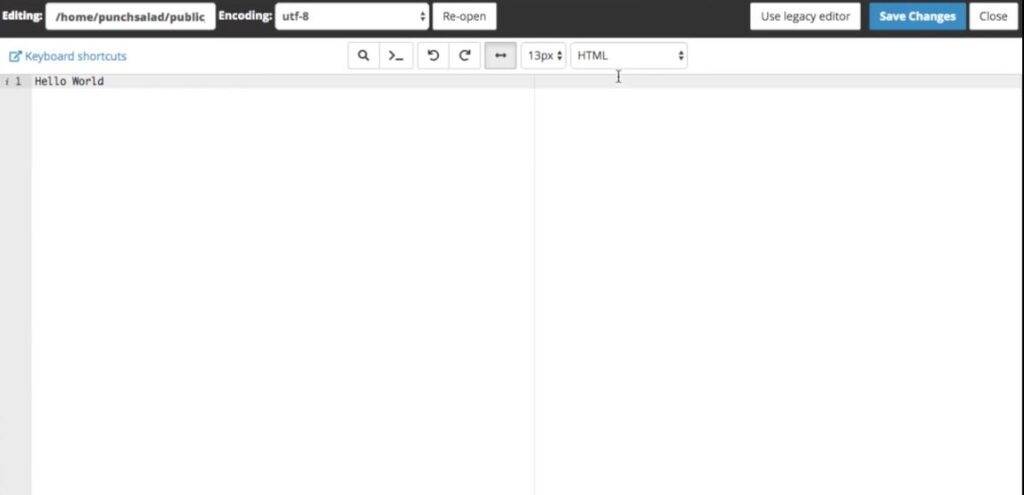
This should create an HTML file in your root directory. To edit the file, right click on the file and click Edit. Approve the edit by clicking on the Edit button on the dialog box that appears.

You should now see a text editor opened. Type in “Hello World” (or whatever you like) and click on Save Changes.
If everything goes well and the nameservers have been successfully changed, you should see “Hello World” (or whatever you typed) when you visit your domain.
So that’s how you transfer Namecheap domain name to a hosting service. Although this article focuses on HostPapa and GoDaddy, the process is similar across other web hosting services. So that’s it! I hope you got what you came for.
Till my next article, Ciao!
My picks and recommendations for you:
– Free SSL Certificate Generator: http://punchsalad.com/ssl-certificate-generator
– Hosting I’m using: Hostpapa (60% discount)
– Where I get my domains: Name Cheap
– See WP plugins I’m using here.
Support my commitment to drinking beer with the PayPal tip jar. Thank you!
#namecheapdomaintransfer #domainnametransfer #digitalworld #punchsalad
Here’s a list of articles you may find interesting:

