
Hello Internet people, I’ll show you how to set up a free WordPress SSL certificate with CloudFlare.
This will work on any hosting. All you need is access to your domain DNS settings, which 99% of the domain providers allow.
When you complete this Tutorial you will have a little green padlock next to your URL.
Alright in this Tutorial you will learn the following:
Wait… that’s for another Tutorial brought to you by sexy Bill cuddling a computer.

What is Cloudflare?
Cloudflare is actually a CDN which offers a free SSL with it. CDN means Content Delivery Network and below is a nice map to showcase how it works.
Basically, they have servers all around the world and your content is copied to all those servers.

Let’s say your user is in Canada. The content will be loaded from a Canadian server or whatever is the closest CloudFlare location. This means the data has to travel less distance geographically, thus it will be loaded faster.
Furthermore, Cloudflare acts as a Layer between the internet and your server. When a user types in your website’s URL, they will go through Cloudflare before landing on your website. Don’t worry, you won’t even notice this.
Learn more about the benefits of CDN.
Setup free Cloudflare account
Let’s get back to the tutorial by going to cloudflare.com.
1. Click on sign up here at the top of the page.

2. Fill in your email and create a password.

I already have an account so I’m going to just log in. In the meantime, just sign up for CloudFlare the steps are really straightforward.
Once you’re done you will see this page.

And if you don’t just click on the “Home tab” and you should see the same page.
Change name server records to point to Cloudflare
With the free account, you get to add an SSL certificate to one domain. So in my case, I’m going to use it this blog as an example.
3. Type in the domain name (without the www and the HTTP).
Just the domain like this befittyblog.com.

4. And then click on “add site”.

5. In the next step, it will tell you that it’s querying all the DNS records.
6. Then click on “next”.

7. and here you will select the plan in my case I’m going to use the free one.

8. Don’t forget to click on “confirm”.
9. Once the page is loaded, there will be displayed all kinds of information about your DNS records.

In summary, every domain has certain records that are publicly available, CloudFlare fetches those and shows all of them here.
10. Double check that there is an orange cloud icon next to your domain name.
![]()
And also the www like this one:

“And if they don’t have an orange cloud, click on the grey cloud next to them and they will become orange.”
11. Next, you can click on “continue”. If you have no errors it’s all good!
Next page, is really useful. It shows your current nameserver records and what they should be for Cloudflare to work.

At this point just copy and paste the new nameserver records to a notepad or any text editor. You will need these soon.
12. When you are done click on “continue”.

13. On the next page, it encourages you to actually modify the DNS records. To achieve this we have to go to the domain provider.
So wherever you bought the domain. All of them allow DNS records changes.
I’m using GoDaddy and I’m already logged in.
14. Go to your account and under the domains, find the domain that you’ve just added in CloudFlare.

15. Click on DNS (this might look slightly different in your domain provider, but the idea is the same).

16. On this page, you can manage your DNS information and you can see there’s a lot of information here if you scroll down in the middle of the page.
You will see the nameservers section and that’s actually what we’re going to change!
As you can see these two are the same as what Cloudflare displayed above.

17. Modify the records by clicking on the “change” button.

18. Next, in GoDaddy, you need to choose “custom”.

19. Now go to your text editor and grab the two DNS records that Cloudflare gave you earlier.
20. Copy paste them in the 2 fields.
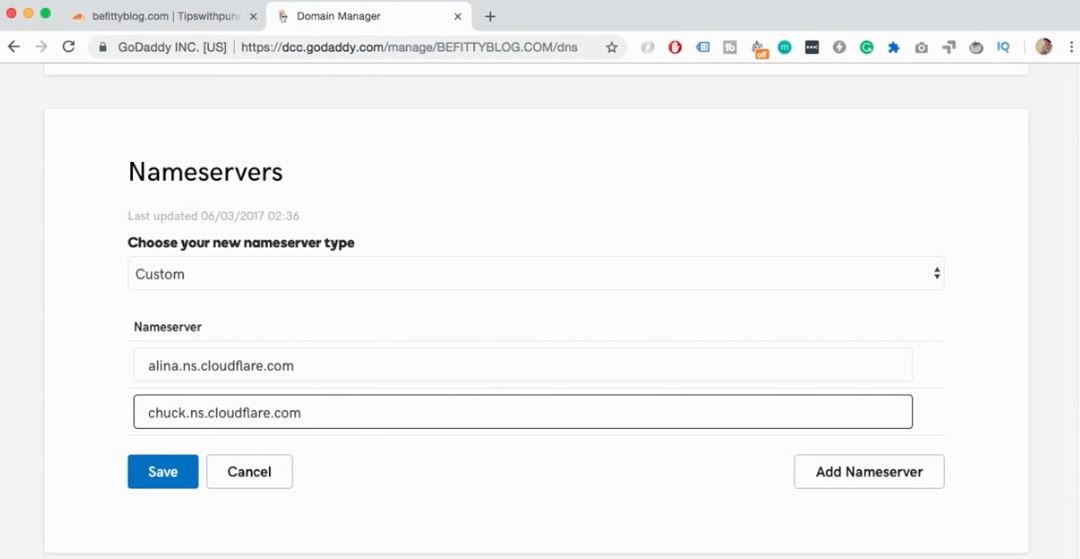
21. Don’t forget to save the changes.
Immediately there’s a notification from GoDaddy that there have been changes and as you can see in the below screenshot, the nameservers are changed to the Cloudflare nameservers.

When Cloudflare notices that you change the DNS to the right nameservers you’re going to receive an email.
Here is the email you will receive:

In summary, it states what you’ve done and the old records and new records. Save this email just in case something goes wrong, you will be able to change the nameserver back to old ones.
22. Then go back to GoDaddy. You’ll see that the page has been refreshed and it’s telling that there are no records. That’s good because it means GoDaddy is not controlling the DNS records anymore. In other words, Cloudflare has taken over.

23. Go back to Cloudflare and click on the “recheck the nameservers”.
It will trigger CloudFlare to check everything again and as you can see once it’s done, the status is active and that CloudFlare is in control of the DNS.

Install SSL certificate plugin for WordPress
Next, we need to install an SSL certificate plugin for WordPress. It will automatically recognize Cloudflare SSL certificate and display the correct SSL on the website.
24. Log in into WordPress.
25. Navigate to “plugins” and click on “add new”.

26. Scroll down to the search box and type in “Cloudflare”.

27. You’ll have a few options, you need CloudFlare flexible SSL.

Then click on “install” and don’t forget to activate the plugin once it’s installed.
The great thing about this plugin is that you don’t need to adjust any other settings. It just works out of the box.
Verify the SSL certificate with CloudFlare
28. Go back to CloudFlare.
29. And in the “overview tab”, just scroll a bit further down the page, until you see the domain summary and there’s a link to “SSL”. Click on it.

30. On the right, the dropdown that says ”full” change it to flexible.

31. Once it’s reloaded. You’ll see that Universal SSL status is ACTIVE. This means that this certificate is installed.

However, it might take up to a day for it to actually work. So you’ll have to wait for the DNS records to propagate. Usually, it takes 30 minutes but it also might take longer.
32. One more thing you need to do on this page, just scroll down. Until you see “always use HTTPS” section and enable it.

It means if somebody types in HTTP it will automatically redirect to HTTPS.
Now if you go back to the website (this might take up to 24h) you should see a green padlock next to the URL.
Common issues with free Cloudflare SSL certificate
If you see a yellow padlock or a padlock with an “i” then you probably have mixed content warning.
In summary, it means that you have some images or some style sheets that are loaded using the HTTP in the URL. The below video shows how to fix it.
How to setup email with Cloudflare SSL
Below in comments Chris resolved this issue by:
If you have an email problem, that’s because you need to create an mx line in Cloudflare, the system is not doing that automatically, so you need to do it yourself. After that, your mail will work as normal.


Hi,
Did all this and it gave it https for a few minuets. Then when I checked back the website would not open, giving error 502 – bad gateway. Cant even open in WP admin. Help!
Hi Matthew, just replied to you on Youtube, did you have an SSL before installing Cloudflare? Can you send me your website urL?
Hi Ali, your site seems to be working well, although I see only one article, but it works or did I miss something?
I have setup clouldflare ssl certificate to my website :https://www.tutsmake.com/
all the things working fine. i have create my own email id in cpanel it was successfully created and send mail to anyone . but i can’t receive email. anyone send me mail to that time show aunthanticated.
help me.
Hi Devendra, Unfortunately, I’m not an expert with the emails, from what I know the https has nothing to do with email provider. I would contact your hosting.
Regards,
Robert
Hi Robert, thanks for your video on Cloudflare SSL installation which followed through after Godaddy told me they will not allow me to use ZeroSSL certificate. Towards the end of your video on Cloudflare, you said that if the padlock does not show up after the cloudflare installation, visit the video to learn how to fix mixed content or the http files. I did not see any video on this fix after the cloudflare video ended. Could you possibly send me a link for this video so I can fix my issues? My site is babyleela.com Thanks
Himanshu
Sure thing Himanshu,
Here tey are:
a video for wordpress: https://www.youtube.com/watch?v=GPkAkL6qpD0
and for custom sites: https://www.youtube.com/watch?v=C3ebk9OLTcw
I hope this helps!
Hi Robert, I have followed the above method without any errors and still i did not got green paddle. I also checked about mixed content warning and i doesn’t even have it but still it doesn’t show green padle. My website is http://www.technologicalweb.com and i am using godaddy’s managed wordpress hosting.
Hi Kuldeep,
From what I know this is not possible on managed wordpress hosting. Or do you have access to cPanel?
It’s hard for me to say what’s going wrong, I don’t think the SSL is installed at all since it’s not giving you anything.
If this doesn’t work for you you can also get SSL through cloudflare (CDN) this works well and is free if you don’t have much traffic. Here is how: http://punchsalad.com/wordpress-tips/free-wordpress-ssl-certificate/
Regards,
Robert
Hi!
Is this something that needs to be renewed every six months?
Hi Moshe, no need to renew every 6 months. There might be some action you need to do after a year, but it’s probably just confirming some policies etc. But cloudflare would contact you about it.
Hi Robert! Thanks for your article, help me lots to understand the ssl world!
I tried to use Cloudflare, unfortunately, things went a bit messy, so I decided to come back to the old configuration with the default godaddy dns names and the things went wrong.
My site was showing a warning message in every browser saying it was a dangerous site, no idea why, maybe because the site was trying to find the old https of Cloudflare? No idea what the solution is, .htaccess maybe? , do you know an easy way to be back to normal? I ended up restoring my WordPress site to an older version.
Would be amazing to see a video of how to come back to normal after using Cloudflare, looks like is a bit hard (at least it was for me).
Oh, and the person above (Devendra) with the email problem, that’s because you need to create an mx line in Cloudflare, the system is not doing that automatically, so you need to do it yourself. After that, your mail will work as normal.
Thanks!!!
Hi Chris,
Sorry to hear that it didn’t work out and that the switch back wasn’t smooth.
And thanks for the tip about the Email. I’ll add it to the article and I think it might help others too.
Your site probably gives the error because you are using https:// but your site doesn’t have SSL.
You might have a redirect code in .htaccess file, which takes all traffic from http to https.
something like:
RewriteEngine OnRewriteCond %{HTTPS} off
RewriteRule ^(.*)$ https://%{HTTP_HOST}%{REQUEST_URI} [L,R=301]
If you have above code in your .htaccess file, just add a hashtag in front of those lines and see if that helps. (# makes the code into a comment, so if it doesn’t work you can easily switch it back.). Here is an explanation how to find .htaccess file etc. http://punchsalad.com/ssl-certificate/install-lets-encrypt-godaddy/#chapter3
I hope this helps.
Regards,
Robert
Hello Robert,
my website is http://www.choupalx.com , and i am using godaddy basic managed wordpress hosting and domain from godday too,
I did exactly what you sad but its showing secure site in wordpress admin panel but not outside of it, and I watch your solution but unfortunately, I don’t have an option to add or modify my domain name from http to https from wordpress setting, please tell me any solution for it.
Hi Deepak, you seem to have some assets loaded from http and not https.
Here is an article on how to fix a mixed content warning:
I hope this helps!
It’s showing an error that is – “Note: Your domain cannot be changed here” during shaving the changes.
and i don’t have cpanl or root access for 2nd solution
Hi Deepak,
you should be able to do this within WordPress. For example, on your home page you have 2 images that have http
72890-ad1.jpg and 72890-ad1.jpg
Make sure these are loaded from https and your homepage will be secure and then you need to do this for all. You can download a plugin that will do this for you if you have a lot of images. Here is an article about it.
Cheers,
Robert
Hi ,Robert interesting stuff good vids to,with the free ssl does that mean cloud fare control the domain from then on ? & will they be charging for renewal ? can you make this a little clearer for the dummies like me thanks Bob
Hello Bob,
From what I know they don’t charge, as long as your website stays small, but obviously they can change their policies at some point. That said they are very trustworthy in my opinion.
Regards,
Robert
Thank you, Robert,
I installed WordPress SSL with Cloudflare and now I have the padlock.
Hi Romana, I’m glad you were able to install SSL on your website. Enjoy your slightly more secure website 🙂
Robert
Hi! I have WordPress server through GoDaddy and tried to follow the steps but ended up with the following error when I try accessing WordPress. Have you seen this error? I am also not seeing https working successfully. ERR_SSL_VERSION_OR_CIPHER_MISMATCH. Have you seen this before?
Hi Jason, Sorry for late reply, where you able to solve your issue?
It looks like something went wrong with SSL certificate installation. Here are some debug instructions: https://kinsta.com/knowledgebase/err_ssl_version_or_cipher_mismatch/
I hope this helps,
Robert
Hi Robert, I moved my domain from Godaddy following your instructions but I do not how how to access my wordpress site, which was being administered by Godaddy.
Otherwise, is it possible to move back to Godaddy now? Maybe your first option (with cpanel) was easier…
Thanks,
Ana
Hi Robert, you have really great tutorials!
Hey listen I am an SEO who is top in Singapore serving international billion-dollar enterprises but now want to start a website to conquer the world. I figure that your tutorials you can really help me to rank.
I am wondering if you were to create similar but unique tutorial blogs like what you already do, can you name a price?
Hi Tom,
I sent you an email.
Cheers,
Robert
Hi Robert,
If I am using WordPress over HTTPS because I have an SSL certificate installed and it is about to expire, do I have to remove that certificate and put WordPress in the HTTP settings? Would the links and images that were placed on pages and posts that are HTTPS be affected? Thanks.
Regards
Henry
Hi Henry,
No need to put in http if your certificate is still valid. It will smoothly switch from one certificate to next.
I hope this helps!
Robert
Installed this on Godaddy and it works perfectly. Thank you so much. Legend!
Glad it helped!